
Just had a phone call from a remote site to get ~5 new HiLook cameras that have been installed and plugged into a PoE VLAN capable switch connected to an NVR
Steps to get them running
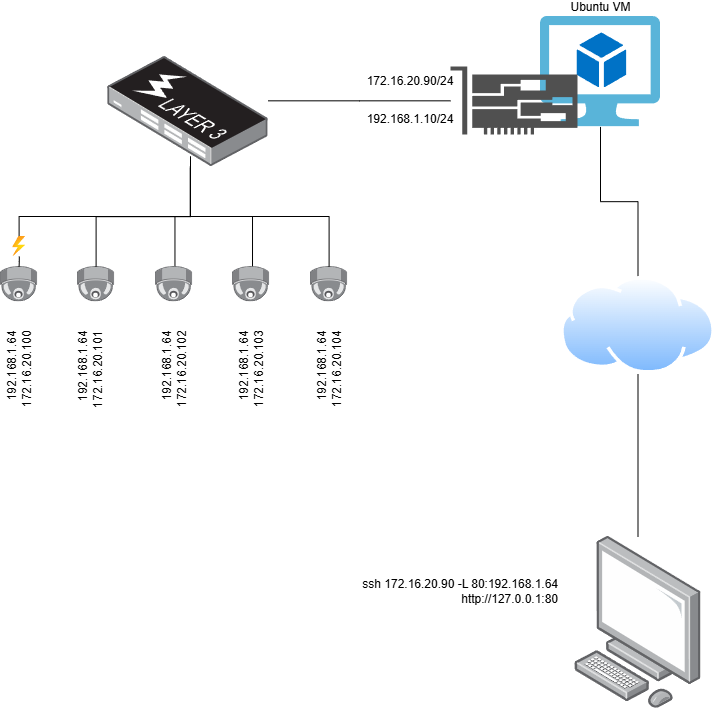
- Install a Ubuntu VM on the same VLAN as the Cameras. You don't need to do this if you have a computer attached directly to the camera network and you can remote screenshare with it, but I like to have a Ubuntu VM on the camera subnet so I can run
tcpdumpto find cameras and devices that may have weird settings and IP's. - Configure the VM to have an IP on the Camera VLAN (172.16.20.90) and a secondary IP on the same network (e.g. 192.168.1.10/24) as the default IP the HiLook cameras get (192.168.1.64) when they first come online. (see example netplan below)
- Move all the switch ports the Cameras are plugged in to to the "Camera" VLAN
- As each Camera will have a duplicate IP of 192.168.1.64 turn off all cameras except one by shutting down the switch ports - (You can do this by turning PoE off on the port and the cam will poweroff or just unplug it if you have someone at the other end to work with)
- SSH into the Ubuntu VM with SSH configured with port 80 forwarded to 192.168.1.64 (see the ~/.ssh/config snippet
- On you workstation connect to the forwarded port 80 and the remote cam using http://127.0.0.1
- You will prompted with an initial setup page. Change the admin password of the Cam and then set an IP on the Camera VLAN e.g. 172.16.20.100/24 gw 172.16.20.254 DNS1: 8.8.8.8 DNS2: 8.8.4.4, set NTP and DST to keep the cam time synced. You will be prompted to reboot the CAM when you change the IP.
- Connect to the NVR configuration portal and search for and add the cam to your NVR
- Un shut each new cameras switch port to boot it up and perform steps 6-8 for each new camera.
Example of the /etc/netplan/50-cloud-init.yaml file for giving your Ubuntu VM on the Cam network dual IP's
network:
  version: 2
  ethernets:
    eth0:
      addresses:
      - "172.16.20.90/24"
      - "192.168.1.10/24"
      nameservers:
        addresses:
        - 8.8.8.8
        - 8.8.4.4
        search: []
      routes:
      - to: "default"
        via: "172.16.20.254"
Example of ~/.ssh/config used to connect to Ubuntu VM and port forward to the IP of the newly booted camera with default settings
Host vm
    HostName 172.16.20.90
    User james
    LocalForward 80 192.168.1.64:80
You can also connect to the remote Ubuntu VM using just ssh without add a config
ssh 172.16.20.90 -L 80:192.168.1.64:80 -l james
Version of Ubuntu (The version or distribution you use is not important)
lsb_release -a
# Ubuntu VM version I used
No LSB modules are available.
Distributor ID: Ubuntu
Description:    Ubuntu 24.04.2 LTS
Release:        24.04
Codename:       noble
Example of using tcpdump in Linux VM to find Cameras broadcasting for an IP
sudo tcpdump -i eth0 arp
0 Comments